
Replacing the spark plugs
Replacing (replacement) spark plugs – spark plugs
In gasoline engines, the charge of air and gasoline inside the engine needs to be ignited. This medium is the spark plugs. In most cases, one spark plug is assigned to each cylinder (in some modern Honda cars, there are two spark plugs per cylinder). The spark plug takes electrical energy from the spark distributor, or from the ignition coil directly into the ignition system without the distributor. The spark plugs are connected to the distributor via cables (wires). The cables from the distributor to the spark plugs are connected to each cylinder in a specific arrangement called the ignition arrangement (the ignition arrangement is different from that of the cylinders).
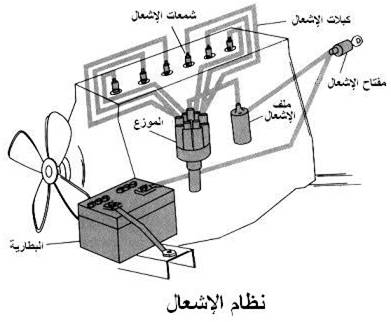 |
The condition of the spark plugs affects the performance of the engine. With the passage of time, the efficiency of the performance of the spark plugs begins to decrease, and with it the efficiency of the engine performance, and the emergence of some accompanying problems such as a decrease in engine power, difficulty in straightening the car, slow acceleration, engine cutting, higher fuel consumption, ignition in the exhaust, engine overheating, rear ignition in the exhaust manifold. .
Therefore, after a period of time, we need to change the spark plugs. Some people change the spark plugs when the accompanying troubles exacerbate. But it is recommended to change the candles after specific periods of time calculated in the distance traveled every 20 thousand kilometers (in modern candles these periods may reach 100 thousand kilometers).
Change the spark plugs:
In most cases, all the spark plugs in the engine must be replaced at once. This is done while the engine is idle and it is desirable that the engine be cool.
What you need for the spark plug removal process:
1. Spark plug, coupling, switch
2. New set of spark plugs
3. Bollard Clearance Gauge
4. A rag or mattress
5. Lee (tube) 5/16″ in diameter by 12″ in length (can be used to reach candle and help loosen and connect).
A special key is used to solve and install the candles with a special socket (box) lined with rubber or with a magnet to hold the candle so that it does not fall through the solution and installation.
When replacing the spark plugs, the wiring must be reinstalled in the original order to maintain the ignition arrangement. So before you solve anything you should number each cable according to the cylinders it is connected to. In the case of lifting one cable and changing the candle and then returning the cable before you start changing the next candle, you do not need to number the cables (in this case, be careful not to let another cable loose). In many cars, the cable lengths are variable in length so that it is difficult to confuse when installing them.
1- Separating the ignition wires (cables): The ignition
wires must be handled gently, as their performance deteriorates quickly in the event of tension, wear, wet injury, or contamination with oil or grease.
To disconnect the cable from the spark plug, just hold the cable by the protective cap of the cable when in contact with the spark plug (do not try to pull on the wire itself, as this may damage it) and twist it left and right while pulling it out, as shown in Figure 1. In some cars you need a softener solution (filter). ) air to hit the bollards.
2- Solving the spark plugs:
Before dissolving the spark plug it is recommended to clean around the base of the candle, if there is compressed air, blow the dust away from the area of the candles. If compressed air is not available, clean with a rag or brush so that no dust falls into the cylinder. Dissolve the spark plug using the spark plug box, size 14 mm or 18 mm as specified in the manual. Install the bit on the spark plug, rotate and press it to ensure its correct installation. Solve the candle tapping by forcefully applying the wrench arm (tool) counterclockwise, you may need to add a joint or joint to the wrench arm if needed. After the candle drip has dissolved, the arm can be raised while keeping the bit in place, and use the hand to turn the bit to dissolve the candle. In the event that the spark plug is not accessible, insert the twist 5/16 inch above the candle and twist out with the twist.
When dissolving the spark plugs, it is preferable to keep them in the same order in case it is necessary to identify the cylinder with combustion problems by checking the spark plug core.
* If it is difficult to remove the candle, loosen it a little (so as not to damage the threads in the cylinder head), then put kerosene or oil on the threads, then re-tighten the candle. Then try loosening after a few minutes.
3- Choosing the appropriate spark plugs: It
is recommended to use the original type of spark plug installed in the car when it leaves the factory, if possible. For Ford cars, it’s Motorcraft, GM products use AC Delco, and Chrysler uses Champion. For Japanese cars, NGK is used, and for German cars, Bosch is used. Refer to parts manual for proper plugs.
4- Adjust the distance between the candle poles (clearance):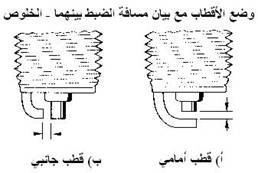
Before installing the spark plug, check that the clearance between the spark plug poles is correct with a wire gauge and adjust the clearance as needed. The clearance between the spark plug electrodes can be found on the vehicle’s specification label under the hood. The clearance between the electrodes is usually in the range of 0.7 to 1.1 mm. To perform the adjustment, insert the wire of the appropriate thickness (according to the specifications) between the outer and inner candle electrode at the tip of the candle. For proper clearance adjustment the wire must pass between the two electrodes with a slight resistance. If the clearance is not set, bend the outer pole until you get the proper clearance. Ensure that the outer electrode is centered over the inner electrode. If not adjusting, bend the outer electrode until it is adjusted.
5- Install new spark plugs:
Install the candle by hand (turn clockwise), after making sure that the installation is correct, use the lever of the wrench to tap on the spark plug no more than a quarter of a turn. Excessive dribbling may damage the screw’s teeth or break or chip the candle seal. Or use a torque wrench to drip the candle according to the values in the car’s manual, and the following table can be used if this data is not available:
| Cylinder head material type | cast iron | light alloy | |
| toggle torque | Newton. meter | Newton. meter | |
| Flat base spark plug | M10 x 1.0 | 10 – 15 | 10 – 15 |
| M12 x 1.25 | 15-25 | 15-25 | |
| M 14 x 1.25 | 20-40 | 20-30 | |
| M 18 x 1.5 | 30 – 45 | 20- 35 | |
| conical base spark plug | M 14 x 1.25 | 15-25 | 10- 20 |
| M 18 x 1.5 | 20-30 | 15- 23 |
In the event that a torque wrench is not available, the following elementary rule can be followed:
Fit the candle and screw it by hand into the clean thread as far as you can, then use the spark plug wrench.
Fair-surface spark plug:
Using the spark plug wrench, turn the new spark plug until resistance is felt and then turn the knob at a 90-degree angle. In the case of previously used spark plugs (dissolved from the engine), turn the switch 5 minutes on an imaginary watch face or 30 degrees after feeling the first sign of resistance from the switch.
– Spark plug with conical base:
Rotate (turn) the candle at an angle of 15 degrees corresponding to 2 to 3 minutes on an imaginary watch face after feeling the initial resistance.
 |
When you do the screwing or loosening process, the key should not form an angle, but the key must be perpendicular to the spark plug; This will either break the candle insulator or push it to the side. Which makes the candle inoperable.
– In the case of dealing with a box switch with a separate lever, the openings in the box must be above the candle so that the lever can be pushed into it. In the event that the holes are at a lower level which makes the arm go through only one hole, this will damage the candle.
4- Push the protective cap on the candle firmly until you feel or hear the sound of the protective cap contacting the candle head.
Repeat the removal and installation steps with the other plugs.
Common mistakes in the process of changing (replacing) spark plugs:
In principle, it is necessary to install the appropriate spark plugs recommended by the manufacturer of the engine or from companies specialized in the manufacture of spark plugs. To avoid the incorrect choice, you should consult specialists or periodicals in this field. Improper selection of the spark plug may cause serious problems for the engine and its performance. Common errors and consequent problems come from wrong coding number, incorrect length of the screw, and modification at the base of the candle.
Wrong coding number:
In all cases, the coding number for the heating range of the spark plugs recommended by the vehicle manufacturer or the recommendations of the spark plug manufacturer must be adhered to.
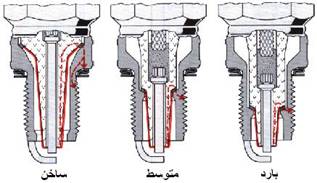 |
The heat range of the spark plugs is defined by a symbolic number of the heat range. The low symbolic number (2…4 bush for example) indicates that the “candle is cold” and has a short, insulated heart. The high symbolic number (7…10 bush for example) indicates that the “candle is hot” and has a long, insulated heart.
* Be careful and make sure of the heat range required for the candle when dealing with Japanese candles, as the symbolic number of the heat range is reversed. Low numbers indicate that the candle is hot and high numbers indicate that the candle is hot. The
wrong length of the thread (tooth): The
length of the thread of the candle must be It is the same length as the threaded head of the cylinder heads.
In the event that the length of the spark plug is longer than the length of the threaded thread in the cylinder head, this will cause the candle to enter more into the combustion chamber space.
Possible damages:
Possible damage to the piston, compression of the thread making it difficult to remove the plug afterwards, overheating of the spark plug.
In the event that the thread of the candle thread is shorter than the length of the thread on the cylinder head, this will result in the candle not entering the combustion chamber space sufficiently.
Possible damages:
Bad ignition of the charge inside the cylinder, the candle will not reach the self-cleaning temperature, leading to the closure of the unused lower teeth of the threads in the cylinder head.
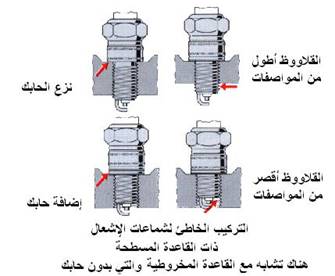 |
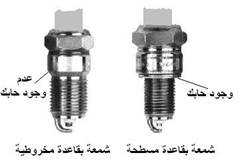
Adjusting the base of the candle:
With a candle that has a conical base, we do not use a flower or a circular interlock. For flat bottom plugs, only grommets are allowed. It should not be removed or replaced with a rose. Without the intercalator, the candle would get inside the combustion chamber vacuum too much. The heat transfer from the candle to the head of the cylinders will be affected, and the candle will not be completely stable in its position.
With the addition of an additional webbing ring, the candle will not go into the threaded hole far enough, and thus the heat transfer from the candle body to the head of the cylinders is affected.
Distance between electrodes (clearance):
When installing spark plugs, pay attention to the distance between the electrodes (clearance). When necessary, the clearance should be adjusted according to the recommendations of the vehicle manufacturer. Adjustment and reset are only applied to the ground electrode of the candle. Care must be taken when performing this operation so as not to damage the axial pole or the insulation of the candle. This applies to both the super candle and the platinum candle. It is for this reason that the special scale should be used for this purpose.
The clearance between the candle poles is set if the appropriate gauge wire is passed without any resistance. It is not recommended to reset the electrode clearance which appears to be corroded. Resetting the clearance in this case will result in a lack of ignition, followed by a loss of power and an increase in fuel consumption. Therefore, it is more economical to change the spark plugs periodically.
It is recommended, during service periods, to check for corrosion of platinum spark plugs, and this can be done by either using a magnifying glass or using a clearance indicator gauge and a wear indicator.
There are no reviews yet. Be the first one to write one.

